When it comes to planning a hunting trip, people tend to place a large amount of emphasis on their choice of gear – like selecting an appropriate rifle / calibre combination, or finding the most comfortable boot. The problem? We often prioritise the trendy stuff over our own personal safety. So, where should you start?
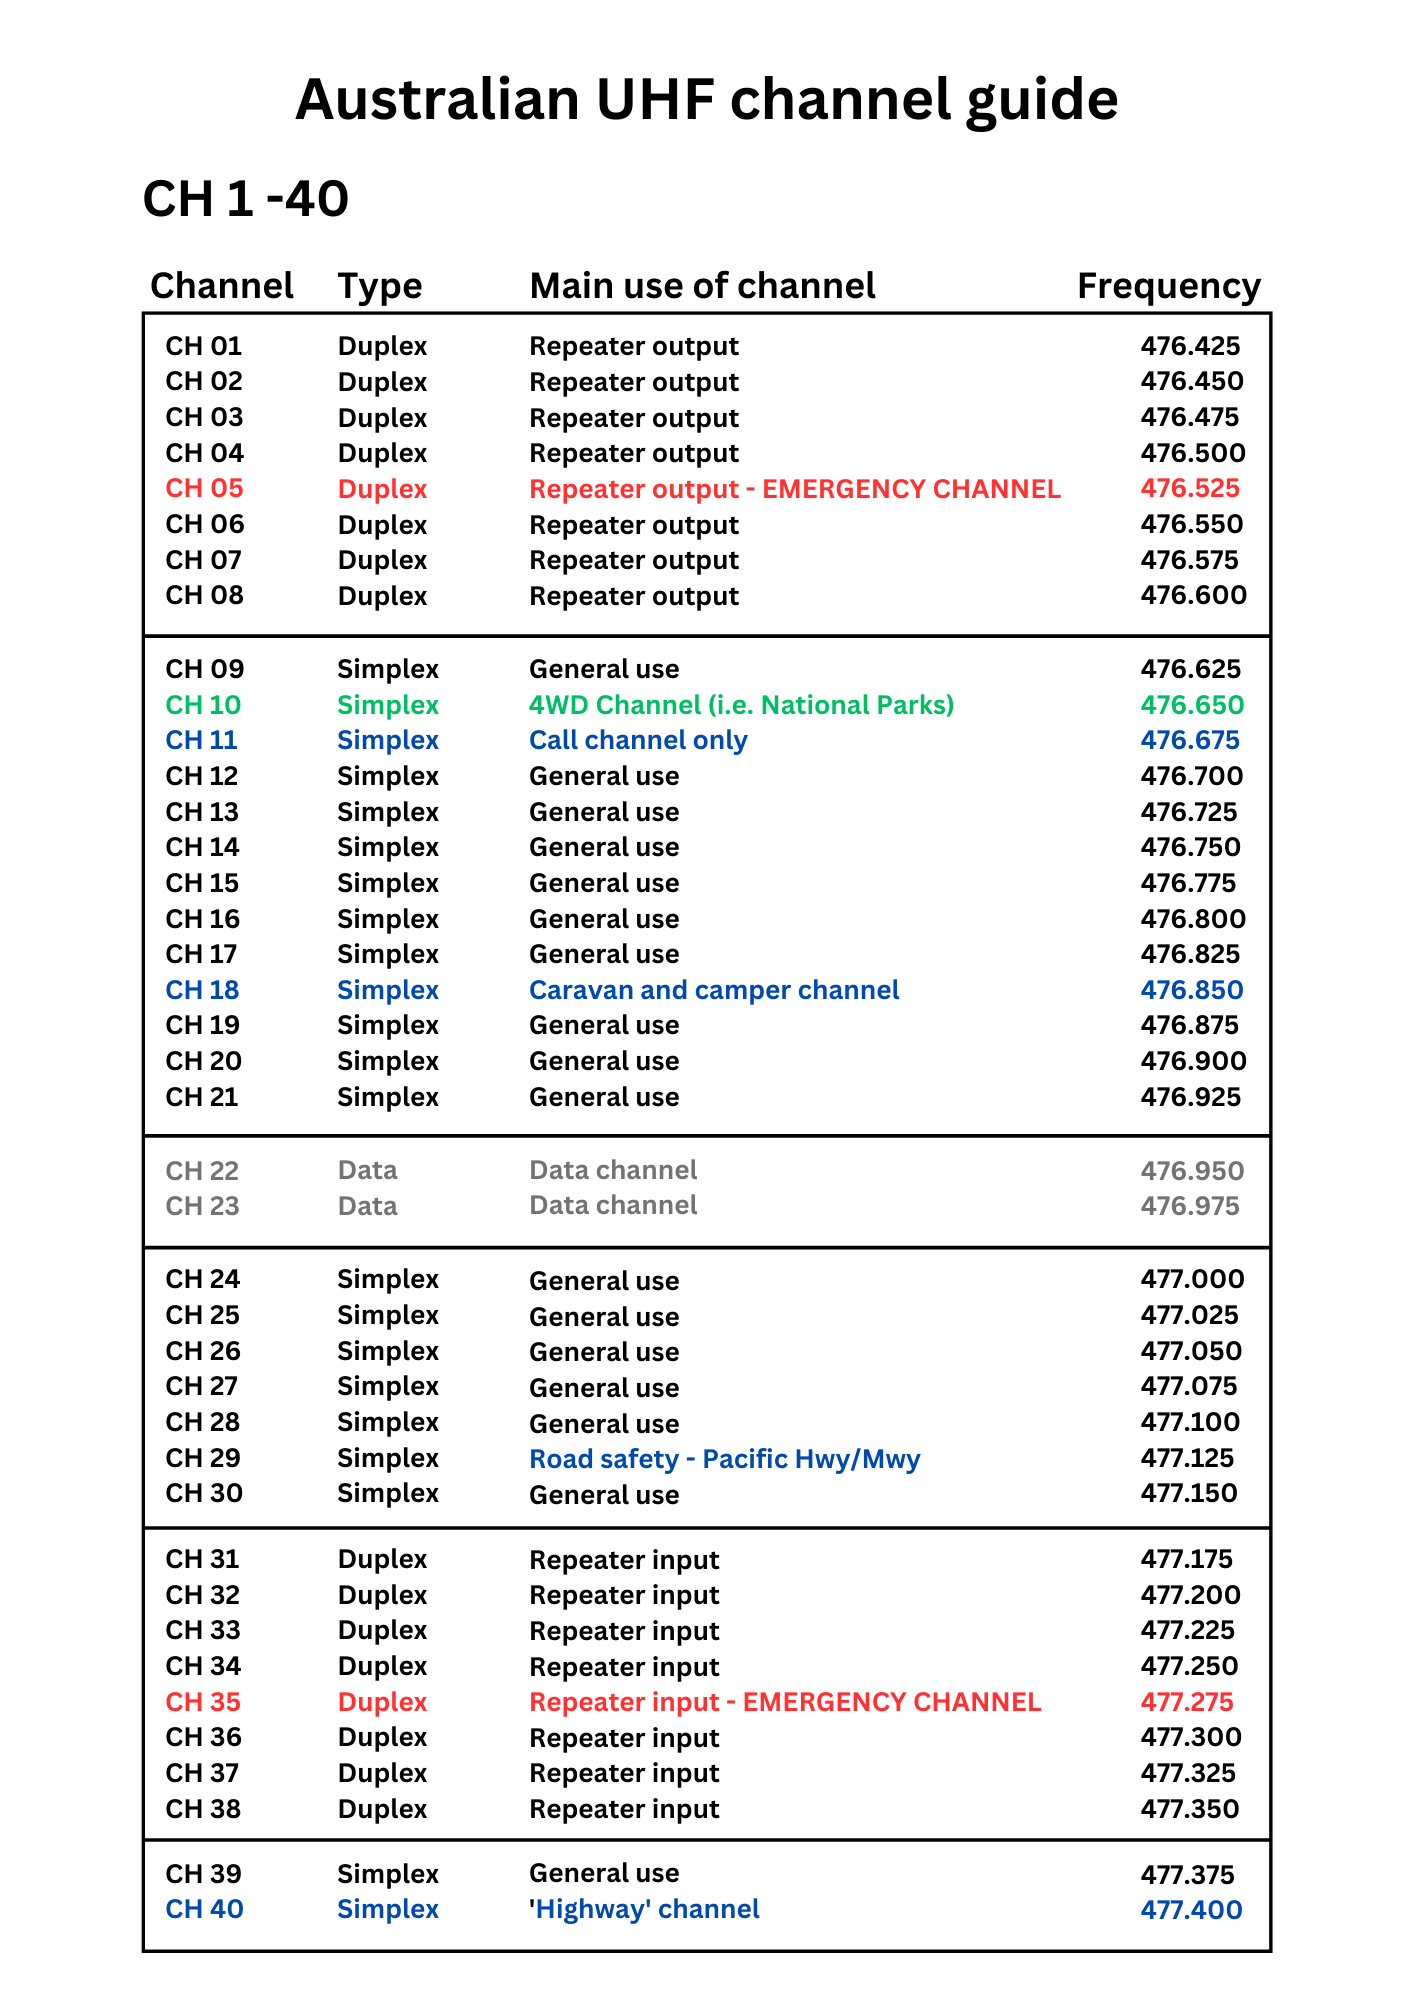
One of the cheapest, and most user friendly safety devices is the UHF radio. In this guide, I’ll discuss the various types of UHF radio that you can buy and how to effectively use them. As a bonus, I’ve also added a channel guide which covers the 40 standard Australian radio frequencies.
Why should I buy a UHF radio?
It’s no secret that modern “smart” phones have you covered with the majority of your daily needs. Got a question? Google it. Need directions? Use maps. Need some company? Well, you get it…
However, as you start to venture off the beaten track – likely in search of more productive hunting forests, you’ll quickly learn the limitations of your modern device. That’s because the majority of state forests (especially here in NSW) are severely lacking in reliable mobile phone reception. If say, you were to have a mechanical failure while out in the field (or touch wood, an injury), help can be nearly impossible to track down. That’s why you need a reliable backup plan.
Enter the humble CB (UHF) radio. Depending upon the capabilities of your chosen handset, it will be possible to contact other users from 8km to 150 km away. While the lower end of that scale may not seem like much, due to their widespread usage – notably with truck drivers, caravaners, and the 4×4 community, that distance may well be far enough to save your life.
What are the downsides of a CB (UHF) radio?
While UHF radios are a cost-effective communication tool, they aren’t without their downsides. Environmental factors, such as mountains and dense forests will reduce the effective range of your device. The thicker the bush, or the more mountainous the terrain, the worse this effect will apply. This of course can be offset by relocating to a more suitable location (on higher ground, with an open field of view), but that’s not always possible in the context of an emergency situation.
For many, budget restraints may also lead to similar issues. Cheaper radios (notably 2W hand-held models) are notorious for their limited range and problems with voice clarity. That’s why it’s important to purchase a quality handset – even if only around the middle price point. An example of this would be the Uniden 5W UHF – UH755, which retails for around $150.
Batteries are another consideration to keep in mind. A portable handset with a dedicated battery pack (like the example above) will hold charge far longer than one with disposable AA or AAA batteries. Provided that you maintain the charge of this battery pack, there is no doubt that you will be able to operate this device for many years to come.
It should go without saying that when it comes to vehicle-mounted models, you will be reliant upon the battery life of the vehicle. If it goes flat, then you’ll be stuck on your own.
Types of UHF radio
Handheld
Small, lightweight, and portable. A handheld UHF radio has all the benefits of a vehicle-mounted unit, at the cost of regular battery maintenance and a reduction in range. If you aren’t good with planning ahead or charging your electronic devices, you may struggle to maintain the lifespan of this device. As such, you might want to consider purchasing a vehicle-mounted unit, or alternatively, keep a second docking station (charger) in your car.
As mentioned previously, a higher-powered 5W model will provide far greater performance over a cheaper 2W model in both range and battery life.
Vehicle mounted
A hardwired unit which is mounted inside the cabin of your vehicle. This type of UHF unit will provide you with maximum range and convenient use while driving, at the cost of it being tethered to your vehicle. While these devices are relatively straightforward to install, you should factor in an additional $300(+) to the retail price, if you lack the time or skills to install it yourself.
Before investing in a vehicle-mounted unit, you should consider the type of environment you will use it in. This will allow you to choose an appropriate antenna to pair with your handset.
Selecting an antenna for your vehicle
While there are many different types of radio antenna on the market, the main factor to consider when purchasing one is what is referred to as ‘antenna gain’.
Antenna gain (measured in dBi) is a measurement that allows us to determine the antenna’s ability to direct or concentrate radio frequency energy in a particular pattern or direction.
High Gain Antennas (8.1dBi) radiate a signal in a straight narrow path, which makes them ideal for use in flat countryside, with few obstacles to obstruct the signal (i.e. trees, mountains, or large buildings). These antennas have the longest overall range.
Medium Gain Antennas (5.1 – 6.6 dBi) are an “all-rounder” option. They should be considered as the middle ground between high gain and unity gain antennas. They lack the range of high gain antennas but suffer from less interference from obstacles like the unity gain antennas.
I recommend this option for anyone who wants to dabble in a bit of everything – from 4wding to cross-country touring.
Unity Gain (2.1 dBi) antennas radiate a signal in a very broad pattern and are far less likely to be obstructed by buildings, trees, or large buildings. The downside is that they lack the overall range of the other antenna options.
Note: Antenna height is another factor to consider, as underground car parks are notorious for making short work of oversized UHF antennas.
Basic functions of your radio
Push to talk (or ‘call’) button
Hold down this button to talk to other users. For the best results, the button should be pressed for 1-2 seconds before speaking and held 1-2 seconds after you complete your message. This will ensure that none of your words are cut off during the transmission.
Scan
Allows the user to scan through all available radio channels. When the unit finds an active channel, it will momentarily pause the scanning process to allow the user to listen to the current conversation.
Lock
Locks the current radio channel onto your handset. This will prevent it from being accidentally switched – which is a common occurrence in handheld models.
Duplex
Allows access to the duplex channel system. Read the section below for further information.
Types of channels
Before we get into the list of available channels, we first need to discuss the two types of channels – simplex and duplex.
Simplex
A single channel that is used for both sending and receiving a radio transmission. These channels operate on a short band network between two UHF handsets, meaning that transmissions can only be sent a relatively short distance.
Duplex (repeater stations)
The duplex system allows the user to extend the range of their transmission by relaying it through a nearby repeater station. These stations are usually located in prominent areas, such as the top of a hill or mountain, and operate by using two specific radio channels (i.e. 5 and 35). In this example, channel 5 acts as a transmitter to send the message, and channel 35 will receive it.
Most modern UHF radios will automatically switch between these two channels once duplex mode has been selected, making the entire process more user-friendly. Just keep in mind that while repeaters are reasonably common around towns, they may not exist in some remote locations.
Testing your connection to a repeater station
To test your connection to a repeater station. hold the push-to-talk (or ‘call’) button for a few seconds, then wait for a response. If a repeater is in range, it will reply with its identification code as a Morse code message (a series of beeps and pauses).
Repeater stations will send this ID code every minute while there is activity on that channel. If you hear nothing, then wait 60 seconds and repeat. If you still hear nothing, then no repeater is within range of your device.
Channel Guide
Click on the image below to view the channel guide.
Designated channel usage
As noted in the channel list above, some channels are reserved for a specific purpose. A brief overview of these can be found below:
Emergency channels (CH5 and CH35)
As the name implies, these channels are strictly dedicated to emergency use only. Heavy fines and even jail time may result from the improper use of these channels.
To use, activate ‘Duplex’ mode on your radio, and send your message on Channel 5.
Critical information: Despite being listed as emergency channels, it is possible they may not be monitored in your area. If you fail to receive a response to your emergency call, attempt to communicate with other users on an alternative channel.
Call channel (CH11)
The sole purpose of the call channel is to make contact with friends or other radio users when their current radio frequency is unknown. Once the appropriate person has been contacted, you MUST switch over to another channel to continue your discussion. This will free up the channel and allow others to use it.
Data channel (CH22 and CH23)
This channel is used to transmit Telemetry & Telecommand data. Do not use this channel.
General use
Channels which are available for use by the general public. However, keep in mind that some of these have been earmarked for a particular use, such as:
4wd and National Park channel (CH10)
A popular channel used by the off-road (4wd) community. This should be your go-to channel when driving through state forests and National Parks.
Caravan and Camper channel (CH18)
A channel commonly associated with campers and grey nomads. This channel is actively used on most highways and campgrounds.
Road safety channel (CH29)
The main channel used by travellers on the Pacific Hwy (NSW), and the Pacific Mwy (QLD). This should be your main source of road safety information while travelling on these roads.
Highway channel (CH 40)
This channel is primarily used by truck drivers and oversized roads. This should be your main source of road safety information when travelling throughout Australia.
General etiquette (manners)
While the UHF network remains a mostly unregulated environment, there are some guidelines you should follow as a matter of basic courtesy to others. This will ensure that radio usage is a pleasant experience for all users.
- Be aware of external factors that may affect your ability to communicate – i.e. strong wind, having a window down on your car, or music that is turned up too loud.
- Keep the conversation to a minimum, and allow others to use the channel.
- Avoid swearing, as not everyone appreciates the colourful language.
- When calling other road users, describe who you are talking to – i.e. Copy Jayco van, this white Mazda ute calling from behind.
Emergency situations
Before making an emergency call
You’ve encountered an emergency situation, and you need to call for help. Your first step (after first aid has been applied) is to determine your approximate location. Topographic maps or handheld GPS units can assist you in providing detailed coordinates of your current location. Alternatively, you can fall back on distinctive features close by, such as; radio towers, lookouts, fire trail markers, etc.
Once you’ve determined your approximate location, it’s time to make the call. Select an appropriate channel from the list above, then take a moment to collect your thoughts and calm your breathing. Now do the following…
Making an emergency call
- Hold down the talk button, wait for a second or two, and say the words – “Emergency, emergency, emergency”.
- Wait 30 seconds. Hopefully, someone will be monitoring your current radio channel and will respond within this time period. If there’s no response, repeat your emergency call again and wait an additional 30 seconds. If there’s still no response, change your radio channel and repeat steps 1 and 2 until you receive a response.
- When you get a response, wait for the person to complete their message. Then respond with; your name, your approximate location, and the nature of the emergency – i.e. This is (insert your first and last name), I am in Heaton State Forest between (insert names of fire trails), I have been bitten by a brown snake.
- Wait for the person to respond and confirm your details.
- Ask the person to contact the appropriate emergency service for you (i.e. ambulance).
- Wait for the person to confirm the request, and ask them to inform you once emergency services have been contact.
- Finally, one of the most important steps is this – DO NOT MOVE FROM THIS LOCATION UNLESS IT IS UNSAFE TO REMAIN IN THE AREA. If you are required to move (i.e. due to a bushfire), do your best to update emergency services on your direction of travel and your destination.
Before heading out on your next trip…
It’s a good habit to check that your gear is in good, usable condition before heading out on your next adventure. In the case of UHF radios, potential issues may arise from; frayed or damaged wiring, bent or broken antennas, poor wiring connections, or depleted batteries.
To alleviate any concerns, you can opt to perform a physical inspection of your equipment, or alternatively, you can perform a radio (or “coms”) check. This can be done by selecting a general-use channel and asking other users – “Can I please get a radio check?” With any luck, someone listening to the channel will give you a response, which will verify that your radio is both sending and receiving communications. It’s as simple as that!
